Controller Companion [.NET] - Controller Mapper Plugin alpha_02
3,993
72
3,993
72
Sweet Phil's Controller Companion
Natively supports Sweet Phil's Slow Motion Plugin and Sweet Phil's Gun Teleportation
Gone are the days of mods not supporting controllers/gamepads. This plugin strives to be an easy to use and multi-functional controller mapper for GTA V mods.
Added in alpha-02
What exactly does this plugin do?
This plugin allows you to map controller inputs to keyboard keys. It allows you to create a custom mapping for each individual mod.
Sounds great! But how does all of this work ?
Each mod's mapping is assigned to a section in the controllerCompanion.ini config file. You can create new sections and remove them as well. You can also switch to any mapping in-game This makes it possible to use this plugin with any GTA V mod currently available.
NOTE: this is an alpha version! More features are coming, including:
How do I add a section for a specific mod ?
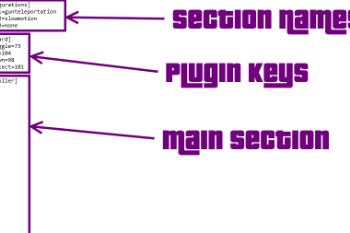
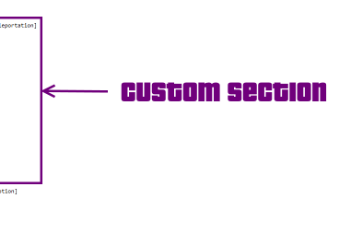
Take a look at the provided tutorial screens and follow the tutorial below.
Installation
ScriptHookV is required. Grab it from HERE
ScriptHookVDotNet is required. Grab it from HERE
.NET Framework 4.5 is required.
1) If you haven't already, create a folder named "scripts" in your GTAV directory.
2) Place the dll + .ini files in that folder.
3) Run GTA.
How to use the in-game menu
Keyboard
Controller
P.S. I'm always open for suggestions and ideas.The comment section is an easy place to place them.
Natively supports Sweet Phil's Slow Motion Plugin and Sweet Phil's Gun Teleportation
Gone are the days of mods not supporting controllers/gamepads. This plugin strives to be an easy to use and multi-functional controller mapper for GTA V mods.
Added in alpha-02
- Menu now works with a controller
What exactly does this plugin do?
This plugin allows you to map controller inputs to keyboard keys. It allows you to create a custom mapping for each individual mod.
Sounds great! But how does all of this work ?
Each mod's mapping is assigned to a section in the controllerCompanion.ini config file. You can create new sections and remove them as well. You can also switch to any mapping in-game This makes it possible to use this plugin with any GTA V mod currently available.
NOTE: this is an alpha version! More features are coming, including:
- Multiple "layers" for multiple key assignments to controller inputs
- Your suggestions!
How do I add a section for a specific mod ?
Take a look at the provided tutorial screens and follow the tutorial below.
- Choose a name for the section (preferably the mod's name, we will choose "myMod" in this tutorial)
- Add myMod to the configurations in the top of the config file (in the place called "section names" in the first tutorial screen) between the second-to-last config[number] and the last config[number] which is set to none.
- Don't forget to increment the number next to "config" and do NOT delete the "none". This "none" tells the parser where to stop when searching for configurations. Without it the plugin will NOT detect the configurations or it will crash.
- Add the section with the same name as before in the .ini file. You can place it anywhere you want.
- Place ALL of the controllers input names in this section. "_" tells the plugin that the controller button has not been assigned to a key.
- Now you can choose which keys to assign to which controller buttons
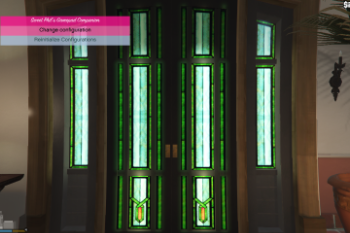
- You have now succesfully added a section/mapping to the plugin. You can switch to this mapping in-game by opening the menu with I and selecting "Change configuration" with numpad5 until your custom section has been selected.
[configurations]
config1=gunteleportation
config2=slowmotion
config3=none
Should become:
[configurations]
config1=gunteleportation
config2=slowmotion
config3=myMod
config4=none
-Empty Space-
Should become:
[myMod]
[myMod]
-Empty Space-
Should become:
[myMod]
A=_
X=_
Y=_
B=_
L3=_
R3=_
LB=_
RB=_
LT=_
RT=_
DPUP=_
DPDN=_
DPLT=_
DPRT=_
RSRT=_
RSLT=_
RSUP=_
RSDN=_
LSRT=_
LSLT=_
LSUP=_
LSDN=_
Named keys should be no problem and should be assigned with for example B for B.
There are however some special keys, and key combinations are also possible, you can find those keys, and more information about key combinations HERE.
Installation
ScriptHookV is required. Grab it from HERE
ScriptHookVDotNet is required. Grab it from HERE
.NET Framework 4.5 is required.
1) If you haven't already, create a folder named "scripts" in your GTAV directory.
2) Place the dll + .ini files in that folder.
3) Run GTA.
How to use the in-game menu
Keyboard
- Press I to open the menu
- Press numpad8 and numpad2 to go up and down the menu
- Press numpad5 to select an item in the menu
Controller
- Keep RB pressed
- Press A to open the menu
- Go up and down the menu with DP-left and DP-right
- Select an option with B
P.S. I'm always open for suggestions and ideas.The comment section is an easy place to place them.
First Uploaded: May 25, 2015
Last Updated: May 26, 2015
Last Downloaded: 3 days ago
42 Comments
Sweet Phil's Controller Companion
Natively supports Sweet Phil's Slow Motion Plugin and Sweet Phil's Gun Teleportation
Gone are the days of mods not supporting controllers/gamepads. This plugin strives to be an easy to use and multi-functional controller mapper for GTA V mods.
Added in alpha-02
What exactly does this plugin do?
This plugin allows you to map controller inputs to keyboard keys. It allows you to create a custom mapping for each individual mod.
Sounds great! But how does all of this work ?
Each mod's mapping is assigned to a section in the controllerCompanion.ini config file. You can create new sections and remove them as well. You can also switch to any mapping in-game This makes it possible to use this plugin with any GTA V mod currently available.
NOTE: this is an alpha version! More features are coming, including:
How do I add a section for a specific mod ?
Take a look at the provided tutorial screens and follow the tutorial below.
Installation
ScriptHookV is required. Grab it from HERE
ScriptHookVDotNet is required. Grab it from HERE
.NET Framework 4.5 is required.
1) If you haven't already, create a folder named "scripts" in your GTAV directory.
2) Place the dll + .ini files in that folder.
3) Run GTA.
How to use the in-game menu
Keyboard
Controller
P.S. I'm always open for suggestions and ideas.The comment section is an easy place to place them.
Natively supports Sweet Phil's Slow Motion Plugin and Sweet Phil's Gun Teleportation
Gone are the days of mods not supporting controllers/gamepads. This plugin strives to be an easy to use and multi-functional controller mapper for GTA V mods.
Added in alpha-02
- Menu now works with a controller
What exactly does this plugin do?
This plugin allows you to map controller inputs to keyboard keys. It allows you to create a custom mapping for each individual mod.
Sounds great! But how does all of this work ?
Each mod's mapping is assigned to a section in the controllerCompanion.ini config file. You can create new sections and remove them as well. You can also switch to any mapping in-game This makes it possible to use this plugin with any GTA V mod currently available.
NOTE: this is an alpha version! More features are coming, including:
- Multiple "layers" for multiple key assignments to controller inputs
- Your suggestions!
How do I add a section for a specific mod ?
Take a look at the provided tutorial screens and follow the tutorial below.
- Choose a name for the section (preferably the mod's name, we will choose "myMod" in this tutorial)
- Add myMod to the configurations in the top of the config file (in the place called "section names" in the first tutorial screen) between the second-to-last config[number] and the last config[number] which is set to none.
- Don't forget to increment the number next to "config" and do NOT delete the "none". This "none" tells the parser where to stop when searching for configurations. Without it the plugin will NOT detect the configurations or it will crash.
- Add the section with the same name as before in the .ini file. You can place it anywhere you want.
- Place ALL of the controllers input names in this section. "_" tells the plugin that the controller button has not been assigned to a key.
- Now you can choose which keys to assign to which controller buttons
- You have now succesfully added a section/mapping to the plugin. You can switch to this mapping in-game by opening the menu with I and selecting "Change configuration" with numpad5 until your custom section has been selected.
[configurations]
config1=gunteleportation
config2=slowmotion
config3=none
Should become:
[configurations]
config1=gunteleportation
config2=slowmotion
config3=myMod
config4=none
-Empty Space-
Should become:
[myMod]
[myMod]
-Empty Space-
Should become:
[myMod]
A=_
X=_
Y=_
B=_
L3=_
R3=_
LB=_
RB=_
LT=_
RT=_
DPUP=_
DPDN=_
DPLT=_
DPRT=_
RSRT=_
RSLT=_
RSUP=_
RSDN=_
LSRT=_
LSLT=_
LSUP=_
LSDN=_
Named keys should be no problem and should be assigned with for example B for B.
There are however some special keys, and key combinations are also possible, you can find those keys, and more information about key combinations HERE.
Installation
ScriptHookV is required. Grab it from HERE
ScriptHookVDotNet is required. Grab it from HERE
.NET Framework 4.5 is required.
1) If you haven't already, create a folder named "scripts" in your GTAV directory.
2) Place the dll + .ini files in that folder.
3) Run GTA.
How to use the in-game menu
Keyboard
- Press I to open the menu
- Press numpad8 and numpad2 to go up and down the menu
- Press numpad5 to select an item in the menu
Controller
- Keep RB pressed
- Press A to open the menu
- Go up and down the menu with DP-left and DP-right
- Select an option with B
P.S. I'm always open for suggestions and ideas.The comment section is an easy place to place them.
First Uploaded: May 25, 2015
Last Updated: May 26, 2015
Last Downloaded: 3 days ago
![Sweet Phil's Slow Motion Plugin [.NET] Sweet Phil's Slow Motion Plugin [.NET]](https://img.gta5-mods.com/q75-w500-h333-cfill/images/sweet-phil-s-slow-motion-plugin/328aef-slowmotion.png)
![Sweet Phil's Gun Teleportation [.NET] Sweet Phil's Gun Teleportation [.NET]](https://img.gta5-mods.com/q75-w500-h333-cfill/images/sweet-phil-s-gun-teleportation-net/7aef42-guntelemain.png)
 5mods on Discord
Its Not Working....
Can You Help?
Kinda sucks that it uses the same combination as the LS Drift mod (RB+A) :/
Hey guys, I will continue working on this after my exams. This project is now on hold for +- 3 weeks.
Doesn't look completely ready just yet but I am eagerly following updates. Great work so far
Sweet Jesus!
@sweet phil what's new about new versions?
*•*S҉W҉E҉ET҉˙*•*Mod*•*S҉W҉E҉ET҉˙*•*
Could you probably make the mod for RAGEPluginHook.exe ?
Hey! I have the lastest ScriptHookV, ScriptHookVDotNet and .net, install in the scripts folder... nothing works cannot open the menu "i"
hey @sweet phil IT NEEDS COMBOS SO IT'LL BE EASIER TO AVOID CONFLICT WITH 'IN-GAME' CONTROLS & a changeable 'Open Menu' key to emphasized since so many mods are now using the same Open Menu key. I haven't tried this mod yet I use an xbox conroller and usually just use Pinnacle Profiler @cheepnis to remap to keyboard keys and go from there but I really need it for my stick layout I play legacy [Old School GoldenEye:007 C-Buttons Style] is there a way to just use your technique to swap the X,Y Axis to any joystick to mach Legacy layout??
i just noticed these post are old AF lol
Hi @sweet Phil. Is this compatible with the xbox Chat pad?
help i cant open the menu
I guess it wont work with a ps4 controller, Right?
@sweet phil I have a ps4 controller and it doesn't seem to work. Does anyone know how I can assign functions to buttons with a ps4 remote? I want turn signal lights to be L1 and R1
Yeah I have an Xbox 360 controller and this mod doesn't seem to work at all. I can't even bring up the menu with L. It was last updated in 2015 so it's probably long gone by now lol
Dead mod :v
@stillhere @sweet phil not possible to update this script for immersion with controller 😉 ?
Hello, I would like to know if you would be willing to help me in editing a mod, it is practically complete, but I am new to creating mods and need help to finish it. Thank you very much in advance.
oh my sweet lord, i didn't understand a thing but i'm ON IT!